
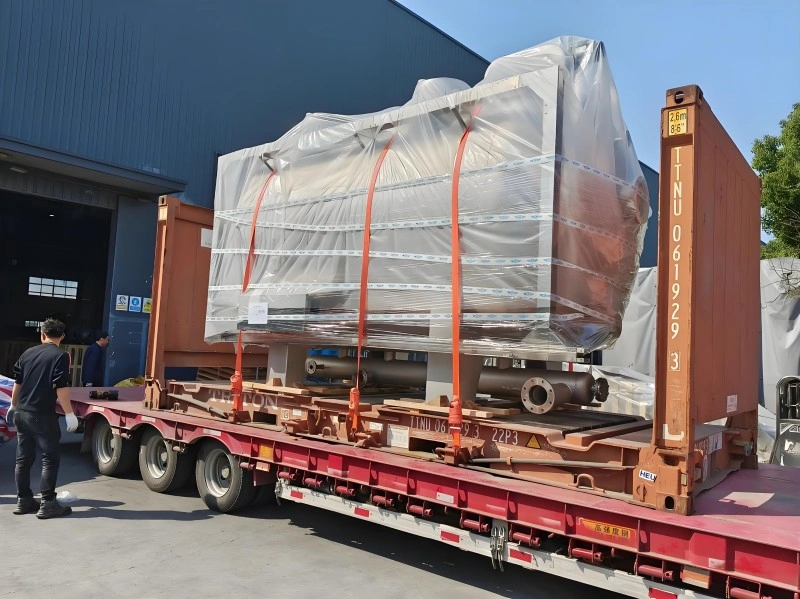
Vacuum packing large machinery for sea freight is a controlled export packing process that consists of cargo inspection, surface preparation, moisture control planning, barrier film selection, vacuum sealing, outer protection, and packing readiness check. It provides a protected, humid atmosphere around the equipment, which helps to prevent the corrosive effects of high humidity, salt air, condensation from containers and extended transit times associated with ocean shipping.
When it comes to machinery, exporters and project cargo teams can’t afford to treat vacuum packing as a last-minute measure: It can be the difference between the machine reaching its destination in perfect condition, or pricey repair jobs on site. Many shippers think a wooden crate will be enough, but crates only protect the product physically, they do not control moisture or prevent product corrosion without the addition of appropriate vacuum packaging.
Why Large Machinery Needs Vacuum Packing Before Sea Freight
Large machinery are subjected to much greater and longer term environmental risks when transported by sea than by road at home. Sea transport can take weeks or even months, and the temperature can fluctuate, salt water can enter the goods, and goods may be delayed at the port or terminal.
| Sea Freight Risk | How It Affects Large Machinery | Why Vacuum Packing Helps |
| High humidity | Causes rust and surface oxidation | Reduces exposure to moisture vapor |
| Salt air | Accelerates corrosion on metal surfaces | Creates a protective barrier layer |
| Container condensation | Water droplets form during temperature changes | Keeps cargo isolated from humid air |
| Port delays | Extends exposure time before delivery | Supports longer-term protection |
| Dust and contamination | Affects exposed components and surfaces | Keeps machinery sealed and clean |
| Rain during handling | May wet packaging or exposed parts | Reduces direct contact with water and moisture |
For exporters handling oversized machinery, fragile equipment, or long ocean routes, professional vacuum packaging for large equipment helps reduce moisture, dust, corrosion, and storage-related risks before cargo reaches its destination.
Step 1: Inspect the Machinery and Identify Protection Needs
The best vacuum packing starts with an in-depth technical evaluation, not by unrolling vacuum film. The haste with which this is done often leaves out areas of vulnerability which only come to light after the vessel has departed.
| Inspection Item | What to Check | Why It Matters |
| Dimensions and weight | Length, width, height, gross weight | Determines packaging size and handling method |
| Sensitive surfaces | Painted, polished, machined, or coated areas | Helps prevent scratches and corrosion |
| Electrical parts | Control panels, sensors, wiring, cabinets | Requires moisture and dust protection |
| Exposed openings | Ports, holes, covers, and interfaces | Prevents dust or moisture entry |
| Lifting points | Forklift pockets, lifting lugs, sling points | Avoids damage during handling |
| Storage duration | Days, weeks, or months before installation | Affects desiccant and barrier material selection |
Use photos and measurements to document. This information helps give the basis for each decision thereafter and can be used as proof of insurance coverage in case of any claim for transportation.
Step 2: Clean, Dry, and Prepare the Machinery Surface
Moisture, dust, oil residue and contamination should never be accidentally sealed inside the vacuum packed pack. If there is any leftover on the machinery, it will stay on the machinery during the whole trip.
| Preparation Task | Purpose | Risk If Ignored |
| Surface cleaning | Removes dust, dirt, and loose particles | Contamination may remain sealed inside |
| Drying | Removes existing moisture | Moisture may be trapped inside the package |
| Anti-rust treatment | Protects exposed metal surfaces | Corrosion may develop during transit |
| Edge protection | Covers sharp corners and contact points | Film may puncture or tear |
| Loose part securing | Prevents movement inside packaging | Parts may damage the film or machinery |
| Open port sealing | Blocks dust and moisture entry | Internal contamination may occur |
Use compressed air, lint free cloths and approved cleaners. Use a volatile corrosion inhibitor (VCI) or anti-rust oil ONLY as recommended by the equipment manufacturer.
Step 3: Select the Right Barrier Film and Vacuum Bag
When selecting industrial packaging materials, the size of the goods, the line of transportation, storage duration and the level of handling risk are all considered for large machinery. Not every movie does well in sea freight.
| Material Factor | What to Consider | Why It Matters |
| Film thickness | Machinery size, weight, and handling risk | Reduces tearing and puncture risk |
| Moisture resistance | Sea freight route and storage duration | Helps control humidity exposure |
| Sealability | Heat sealing quality and edge closure | Prevents air leakage |
| Puncture resistance | Sharp edges, bolts, brackets, and corners | Protects packaging integrity |
| Bag size | Custom fit around machinery | Avoids excess folds and weak points |
| Inspection access | Labels or viewing areas if needed | Supports checking without opening packaging |
For ocean transport, experienced teams tend to recommend a number of layers of barrier films that have a highMVTR rating, which is moisture vapor transmission rate.
Step 4: Place Desiccants and Moisture-Control Materials Correctly
Even though the package is carefully dried and air extracted from it, there may be moisture left inside the package. This moisture is absorbed by the desiccants, which keep the humidity at a low level.
| Moisture-Control Item | Function | Placement Consideration |
| Desiccant bags | Absorb residual moisture | Distribute around cargo, not only in one corner |
| VCI materials | Help protect metal surfaces from corrosion | Place near exposed metal components |
| Humidity indicator | Shows moisture condition inside packaging | Position where it can be checked if possible |
| Inner liner | Separates cargo from film or crate | Prevents rubbing and contamination |
| Protective covers | Shield control panels or sensors | Use around sensitive components |
Determine the quantity of desiccant to use in the internal volume, estimated transit time, and route climate data. Over or under-dosing is a problem both ways.
Step 5: Vacuum Seal the Machinery Package
When vacuum sealing large and odd-shaped equipment, it’s important to do it correctly to prevent the sealing film from becoming over-stretched or having weak spots at corners and protrusions.
| Sealing Step | What Happens | Quality Check |
| Bag positioning | Film is arranged around the machinery | No sharp points pressing directly into film |
| Air extraction | Air is removed from the package | Film fits closely without overstretching |
| Heat sealing | Open edges are sealed | Seal line is continuous and clean |
| Seam reinforcement | Weak areas are reinforced if needed | Corners and edges are protected |
| Leak check | Package is inspected after sealing | No visible air return or loose seals |
| Labeling | Handling and unpacking marks are applied | Cargo can be handled correctly |
Sealing should be done in a clean, dry environment and, if possible, before moving the package, a 24-hour leak test should be performed.
Step 6: Add Outer Protection for Sea Freight Handling
While vacuum packing is excellent for moisture and contamination control, large machines still require adequate physical protection when they are lifted, stacked and moved on a vessel.
| Outer Protection Method | Best Used For | Added Protection |
| Wooden crate | High-value machinery and sensitive equipment | Impact and stacking protection |
| Steel base or skid | Heavy machinery | Stable lifting and load transfer |
| Shock pads | Precision machinery | Vibration and impact reduction |
| Corner protection | Irregular equipment shapes | Prevents film damage |
| Waterproof cover | Outdoor handling or temporary storage | Adds weather protection |
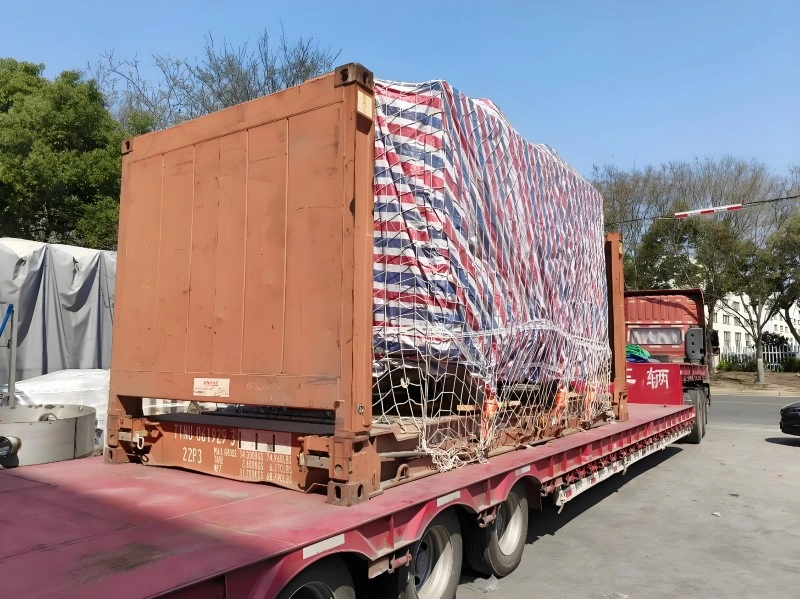
| Lashing coordination | Flat rack or open top shipments | Prevents cargo movement during transport |
Plan and coordinate the design of the package for the vacuum package with the container type (standard packages, flat rack or open top) and with the lashing plan.
Step 7: Inspect, Label, and Prepare for Loading
The final inspection prior to loading is imperative. This step will help identify potential problems that might affect the entire shipment.
| Final Check | What to Confirm | Why It Matters |
| Seal condition | No gaps, tears, or weak seams | Prevents air and moisture leakage |
| Film surface | No punctures or overstressed areas | Maintains packaging integrity |
| Desiccants | Correct quantity and placement | Supports moisture control |
| Labels | Handling, lifting, and unpacking marks | Reduces handling mistakes |
| Photos | Condition recorded before shipment | Helps with traceability and claims |
| Loading plan | Matches packaging and cargo dimensions | Avoids damage during loading |
Complete a comprehensive pre-loading condition report signed by both packer and logistics coordinator.
Common Mistakes When Vacuum Packing Large Machinery
Ineffective vacuum packing is not due to the vacuum packing method, but is caused by poor preparation, improper materials, or missing final checks.
| Mistake | Possible Result | Better Practice |
| Packing damp machinery | Moisture trapped inside | Dry and inspect surfaces first |
| Thin barrier film | Tears or punctures during handling | Use industrial-grade material |
| Unprotected sharp edges | Film damage and seal failure | Add edge and corner protection |
| Too few desiccants | Humidity remains active | Calculate based on volume and transit time |
| Poor seal quality | Air leakage during transport | Inspect all seal lines |
| No loading coordination | Packaging damaged during lifting | Align packing with loading method |
When Vacuum Packing Should Be Combined with Crating or OOG Transport Planning
For large equipment, this often means multiple layers of protection, particularly if dimensions are larger than standard container dimensions or if the equipment is highly sensitive.
| Transport Situation | Recommended Protection Plan |
| Standard container machinery | Vacuum packing + pallet or crate |
| Precision machinery | Vacuum packing + crate + shock protection |
| Oversized machinery | Vacuum packing + flat rack loading plan |
| Tall machinery | Vacuum packing + open top container planning |
| Heavy machinery | Vacuum packing + skid base + lifting plan |
| Long-term storage before installation | Vacuum packing + desiccants + protective outer cover |
At Bentlee, we always ensure that our OOG solutions are integrated with our vacuum packing; from the special vacuum packing trailers to the ultra-low flatbeds to the exact 3D load planning, protection is seamless from the factory to the destination.
Buyer Checklist Before Requesting Vacuum Packing for Large Machinery
Having the right information ready in advance enables packaging teams to start to provide accurate quotes and optimal solutions in record time.
| Information to Prepare | Why It Helps |
| Machinery dimensions | Determines packaging size and material usage |
| Gross weight | Supports handling and base design |
| Photos or drawings | Helps identify sensitive areas and sharp edges |
| Shipping route | Helps evaluate sea freight moisture risk |
| Storage duration | Determines moisture-control requirements |
| Loading method | Affects outer protection and lifting design |
| Surface sensitivity | Helps decide anti-rust and scratch protection |
| Electrical components | Requires extra moisture and dust protection |
| Destination handling conditions | Helps plan labels and unpacking instructions |
Conclusion — Successful Vacuum Packing Starts Before the Cargo Is Loaded
The vacuum packing of large machinery for sea transport is an organized process and requires planning, technical knowledge and close coordination with the transport plan. If it’s executed properly, it can help minimize the potential for water damage, corrosion, dust contamination and handling problems that are often experienced with ocean shipping.
Large equipment can be significant capital expense and can have long lead time for replacement. The same is true when it comes to protecting that value: It pays off at the destination if this value is protected through proper inspection, surface preparation, moisture control, vacuum sealing and integrated outer protection. Packaging solutions, crating solutions, container selection, and lashing solutions are integrated in the project in the initial stages to ensure safer and more reliable deliveries for the exporter.
The best results have come from a vacuum packing process that is considered part of the overall export packaging and logistics program, instead of just a wrapping problem.